Monday, December 7, 2020

Clay Snowmen


This project involves making snowmen out of clay. A pinch pot technique is used to create each level of the snowman. After the clay is formed, students will make X’s in the parts of the clay that they want to attach. Students will also use water to “glue” the clay circles together. As the clay is drying, students can smooth out the clay with water. In addition, students can use wooden tools to make the holes for the arms. After the clay is close to dry, students can paint the front of the clay white. The back of the snowman should be left unpainted until the clay is completely dry. After the white paint is dry, students can add on the decorations using sharpies and pipe cleaners.


As an extension activity students can find the area of their snowmen. In math, they can learn about how to find area of a circle. Then they can find the area of all three circles and add them together.

Tuesday, November 17, 2020

Printmaking

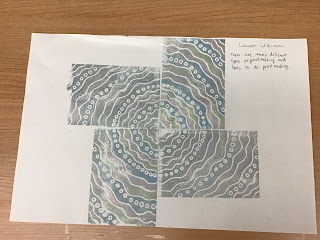
This project involves using markers and foam pieces to make a print design. To start, students are given a small piece of paper to make their design. Students then trace their design onto a foam piece. After that, they use wooden pencils to make more prominent indents in the foam. Once that is completed, students use marker to color the foam piece in every spot except the indents. Then students will coat their foam piece in a special silver paint using a roller. Then, students lay their foam piece on their paper with the paint and marker side down. To transfer all of the marker over, students use a clean roller to press down all parts of the foam piece. Once that is completed, students will wash off the foam piece and then recolor the piece to make another print.

As an extension project, I would have students take their completed radial designs and cut out a pinwheel. Then everyday for science For about a month, we would take five minutes as a class to go outside and determine if there is any wind each day. I would also have students turn their pinwheels to see if they can find which direction the wind is coming from. Students would record this data, and at the end of the month make a graph sharing their results. 
 

Saturday, November 14, 2020

Vincent Van Gogh’s “Starry Night”


 In this activity, students learn about Vincent Van Gogh. They then take what they have learned to inspire them to create their own version of Starry Night. To start, students cut up pieces of tissue paper and use midge lodge to glue the pieces to the black background. After this is completed, students take crayons to make marks around their tissue paper to support the swirls. Next, students cut out a foreground of their choosing. They can support the shapes the cut with crayons too. Finally, they glue these shapes on and write their names on the project.

To build on this lesson, students could be instructed to write short poems about their Starry Night. They could tell a story through their poem about how they think the characters or animals that would be in their scene feel.

Tuesday, November 10, 2020

Drawing Insects


This project is all about symmetry. Students are guided to fold a large piece of watercolor paper in half. They can choose to fold it in half horizontally or vertically. Students then pick an insect to draw an outline of in pencil first, then in sharpie. Students should do their best to make a symmetrical outline. After that students use crayons to make designs on their insects. Students were instructed to create at least 3 different designs that should also be symmetrical. Finally, students use water colors to support their designs. 

As an extension activity, students could be given printed pictures of real insects, and they have to draw the line of symmetry. Furthermore, you could integrate science in by pointing out different types of insects, and insect body segments. 

Painting Turkeys


 This project is a lesson for using the medium painting. The project is done by first mixing paint to make brown, and then painting the back of two paper plates, one large and one small (or a second large plate cut down to a smaller circle). Why that is drying, students can move to the feather station, where they spray a layer of shaving cream, and then paint is dropped on top of the shaving cream to be swirled around to look like a marble effect. Students then dip a rectangular piece of paper into the shaving cream swirl. After they pull the paper off the shaving cream, they scrape off the excess shaving cream, leaving a marble effect on the paper. After those dry, students can cut out a feather shape. Next, students cut out shapes for the eyes, beak, neck, and feet. Finally, once everything is dry, the students glue everything together. As students work, the teacher has lots of opportunities to teach how to mix paints to achieve the desired color. In addition, shapes, and movement are great areas to talk about with students.

As an extension activity, would be to have a discussion on unity/diversity. Students would be instructed to go on a gallery walk to see everyone else's turkeys. Once everyone has a chance to see all of the turkeys they would sit down to discuss the similarities and differences. As the discussion goes on, I would guide students to seeing that the feathers are different because they all have different swirls, but they are similar because they all have the marble effect. Even though the feathers have different swirls and may have different colors, but they all look super cool. Then, I would lead the discussion to talk about how each of us have differences, but we can all get along because we all have wonderful characteristics, even if those characteristics are different. 

Paper Weaving


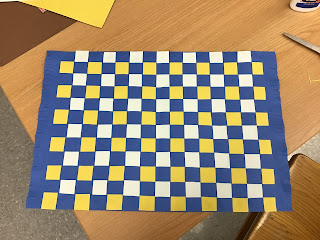
 This project is all about weaving, colors, and lines. Students are tasked with picking colors that mean something to them to make their projects. For me, I chose yellow to represent joy, white to represent faith, and blue to represent peace. Students can pick whatever colors they would like to use, and they attach a piece of paper on the back with what the colors they chose means to them. The teacher has a great opportunity to discuss the history of weaving and its uses in different cultures too. Furthermore, the teacher can talk about lines as a principle of art. 

For an extension activity, students can write more about the colors they chose and why. They can write three different paragraphs, one for each color, to explain what the colors represent to them. They can further this by explaining why the ideas they chose represent them. 

Wednesday, October 7, 2020

Hidden Animals


 Can you find the hidden animal? Probably not, especially over a computer screen, but a hidden animal is drawn in light blue underneath the chaotic scene of warm colored shapes. This project allows students to practice making patterns and using warm colors. The procedure to make this project starts with students creating special superhero glasses. A red graphic overlay film is glued to construction paper cut in the shape of glasses or goggles. This will allow students to see the hidden animal after the project is completed. Why the glasses are drying, students move on to the actual drawing part. They start by using a light blue colored pencil to draw an animal on a plain white piece of paper. Then the students use warm colored crayons to make lots of patterned shapes to hide their animal. After the students complete this step, they finish up by writing three clues on the bottom of the frame that gives hints as to what the animal is. After the project is complete students can put on their goggles to view the now hidden animal. 

As an extension activity, you could have students subtract the number of one shape by the number of a different shape. For successful answers, you could reveal a hint to the students so they can slowly guess what the animal is. 

Clay Snowmen

  This project involves making snowmen out of clay. A pinch pot technique is used to create each level of the snowman. After the clay is for...